Last updated on Jul 12, 2026.
Import 3D brings external mesh geometry into Revit as DirectShape elements.
Use it when you need to place OBJ, DAE, glTF/GLB, STL, Rhino 3DM, or FBX content in a Revit project or family and keep control of scale, placement, materials, and textures.
On Revit 2025, 2026, and 2027 the importer runs as a guided four-step wizard with the expanded format set and texture import. On Revit 2015–2024 it runs as the classic single-window importer and supports OBJ, DAE, GLTF, and GLB. This guide documents the wizard; the same settings apply in the classic window.
Getting started
Overview
Import 3D is intended for Revit users who need to bring external 3D content into a model without rebuilding it natively first. The import wizard walks through four steps — Source, Placement & scale, Materials, and Import — and finishes with a summary that accounts for every mesh, face, and material. A separate command, Reassign Material, retargets materials on imported DirectShape elements.
Use it for manufacturer geometry, context models, visualization assets, or other external mesh content that needs a controlled place in the Revit model.
Requirements
- Supported Revit installation (Revit 2015–2027) with Import 3D installed.
- On Revit 2025 and newer, the .NET 8 Desktop Runtime (x64) — the installer checks for it and tells you if it is missing.
- A writable Revit project or family document.
- A supported source file: OBJ, DAE, GLTF, or GLB on any Revit version; additionally STL, Rhino 3DM, FBX, and Draco-compressed glTF on Revit 2025 and newer.
- All sidecar files present for GLTF files (textures, .bin buffers) and the MTL file for OBJ when used.
- A destination Revit category for the imported DirectShape elements.
Install and uninstall
Deploying to multiple machines? This section covers standard local installation. For automated deployment by IT administrators or BIM managers, see the Silent Installer Guide.
Install
- Close Revit.
- Run the Import 3D installer with administrator rights.
- Complete the installer steps and any license activation that applies to your setup.
- Start Revit.
- Confirm that Import 3D and Reassign Material are available on the Archi tab in the Utilities panel.
Uninstall
- Close Revit.
- Open the Windows uninstall entry for Import 3D.
- Confirm removal.
- Open Revit again only after the uninstall is complete.
Uninstalling the plugin does not remove DirectShape elements that are already present in your models.
Quick start
- Open the target project or family in Revit.
- Run Import 3D from the Archi tab.
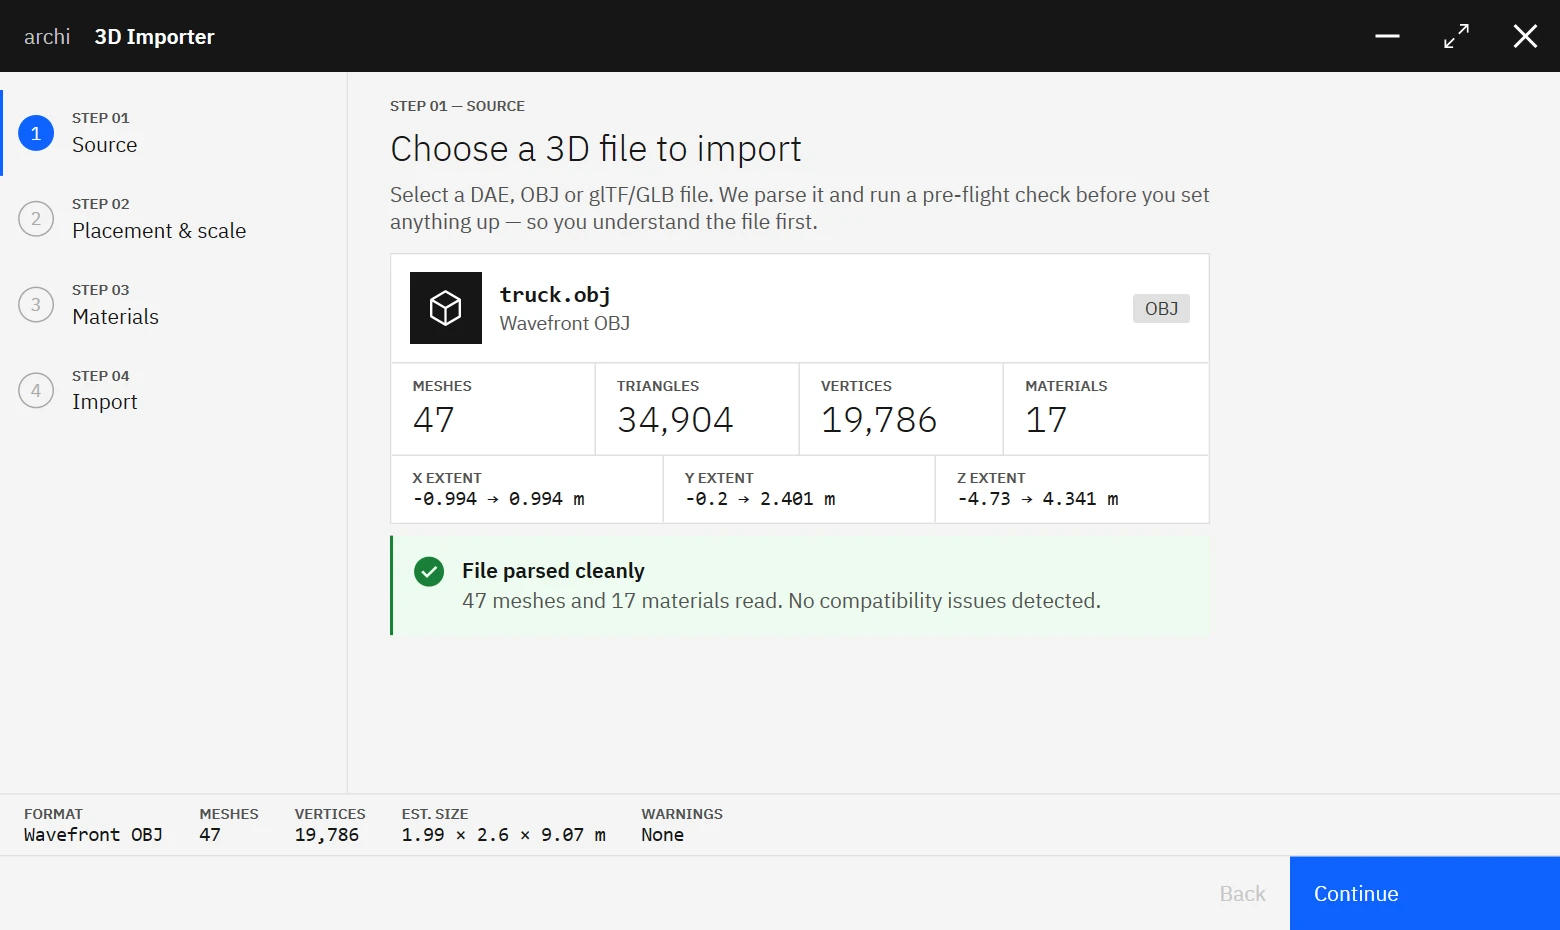
- In Step 1 — Source, browse to a supported file (or click Load demo). The wizard parses the file and shows bounds, mesh, triangle, and material counts with a pre-flight compatibility check.
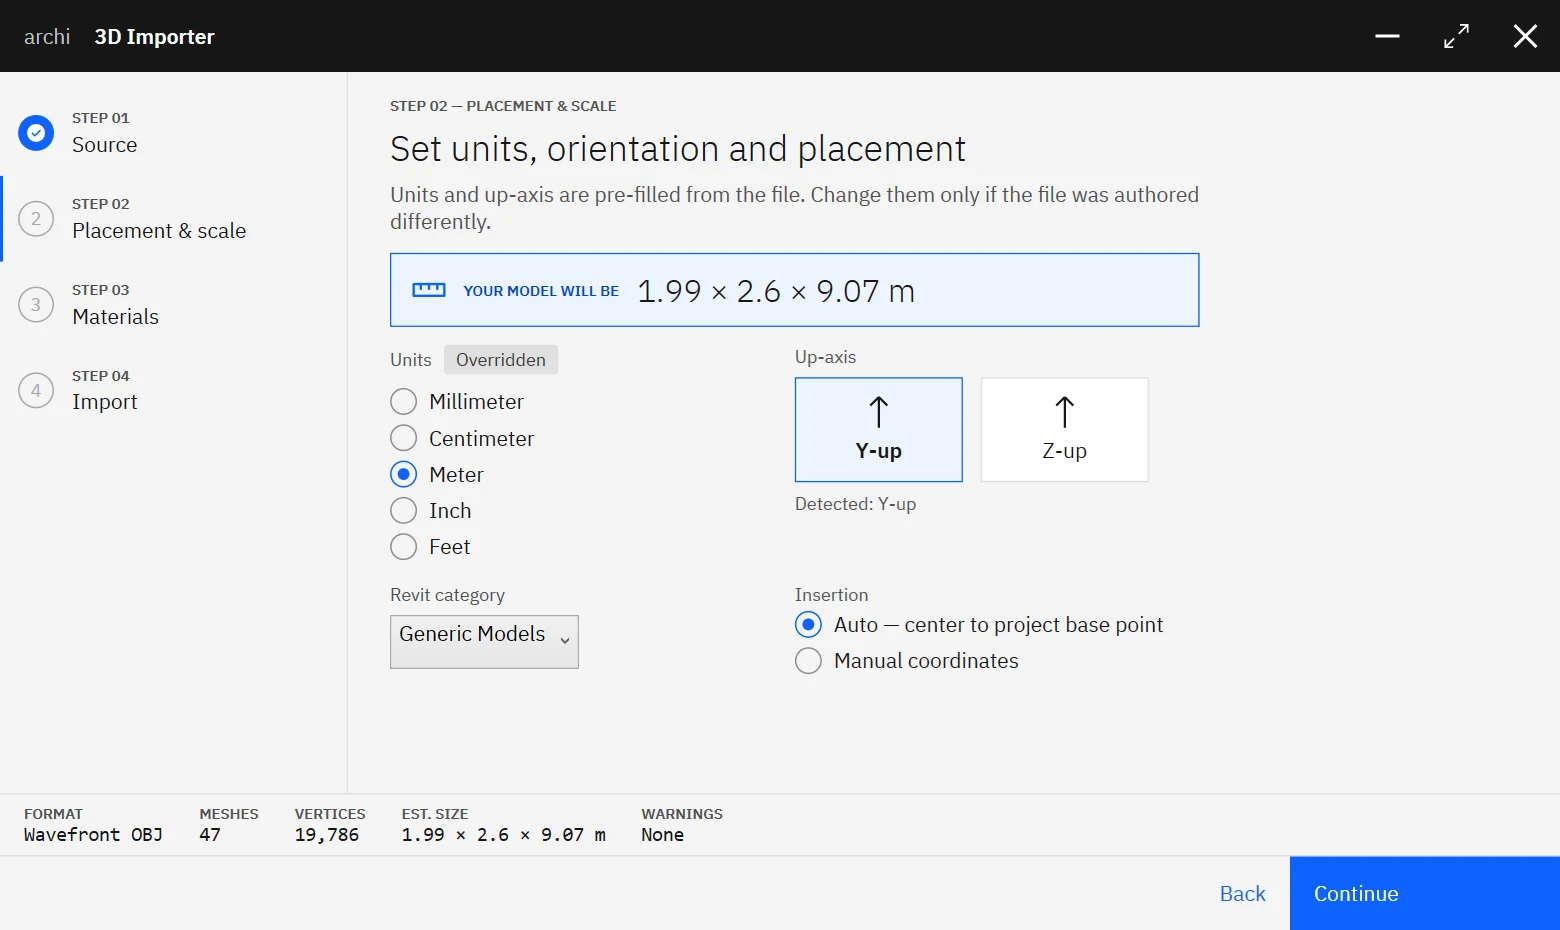
- In Step 2 — Placement & scale, confirm the auto-detected units and up-axis, keep automatic centering for a first test, and choose a destination Revit category.
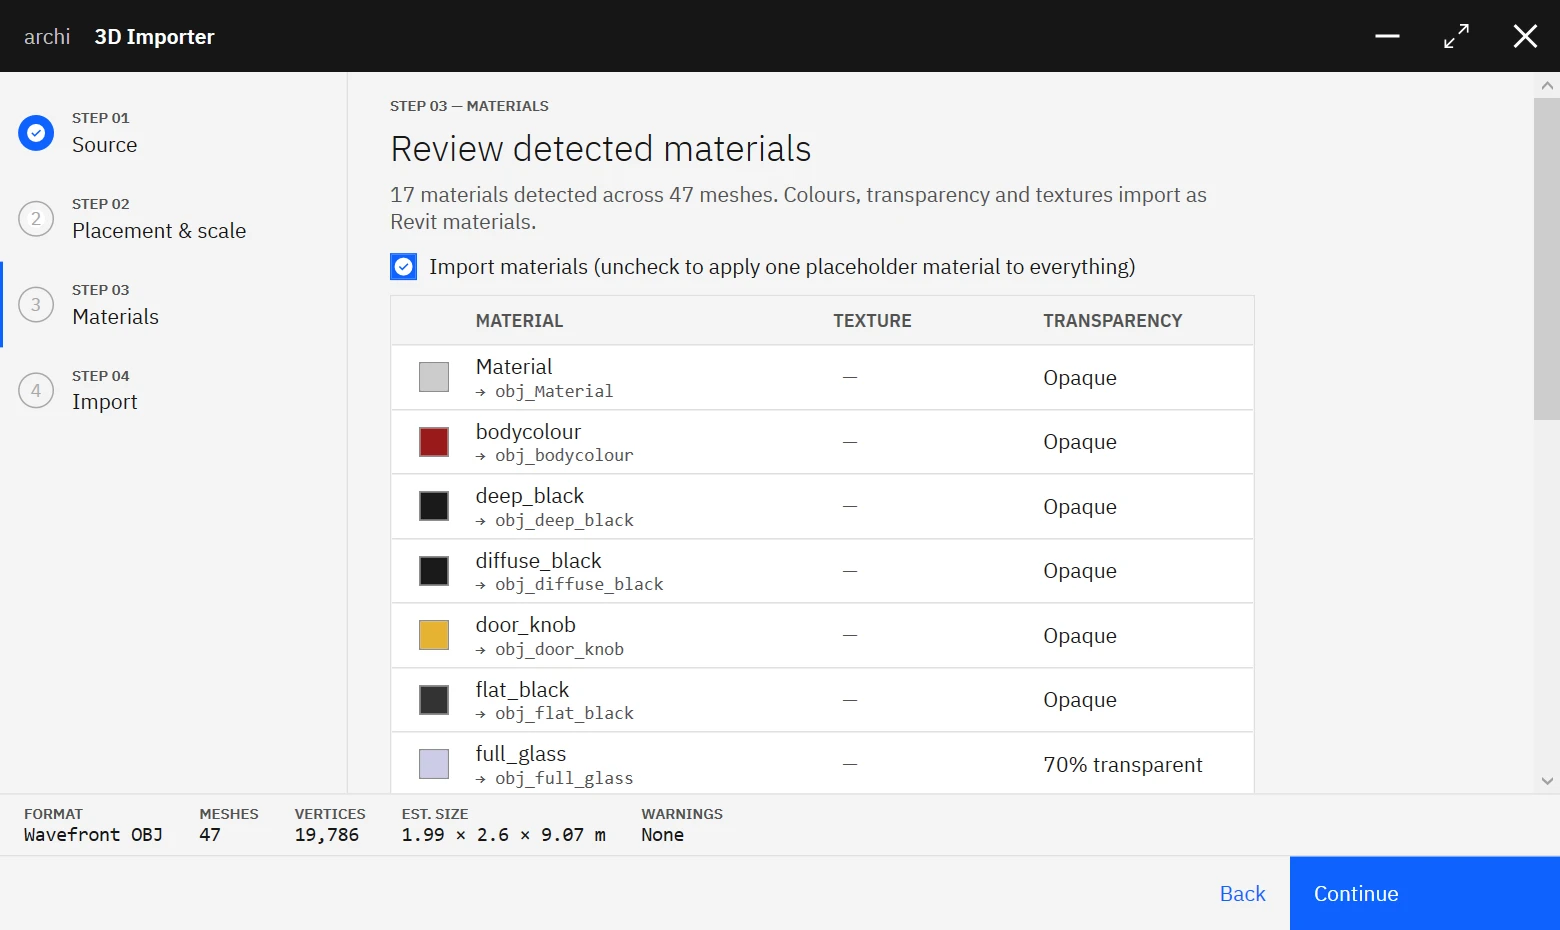
- In Step 3 — Materials, review the detected materials, then continue.
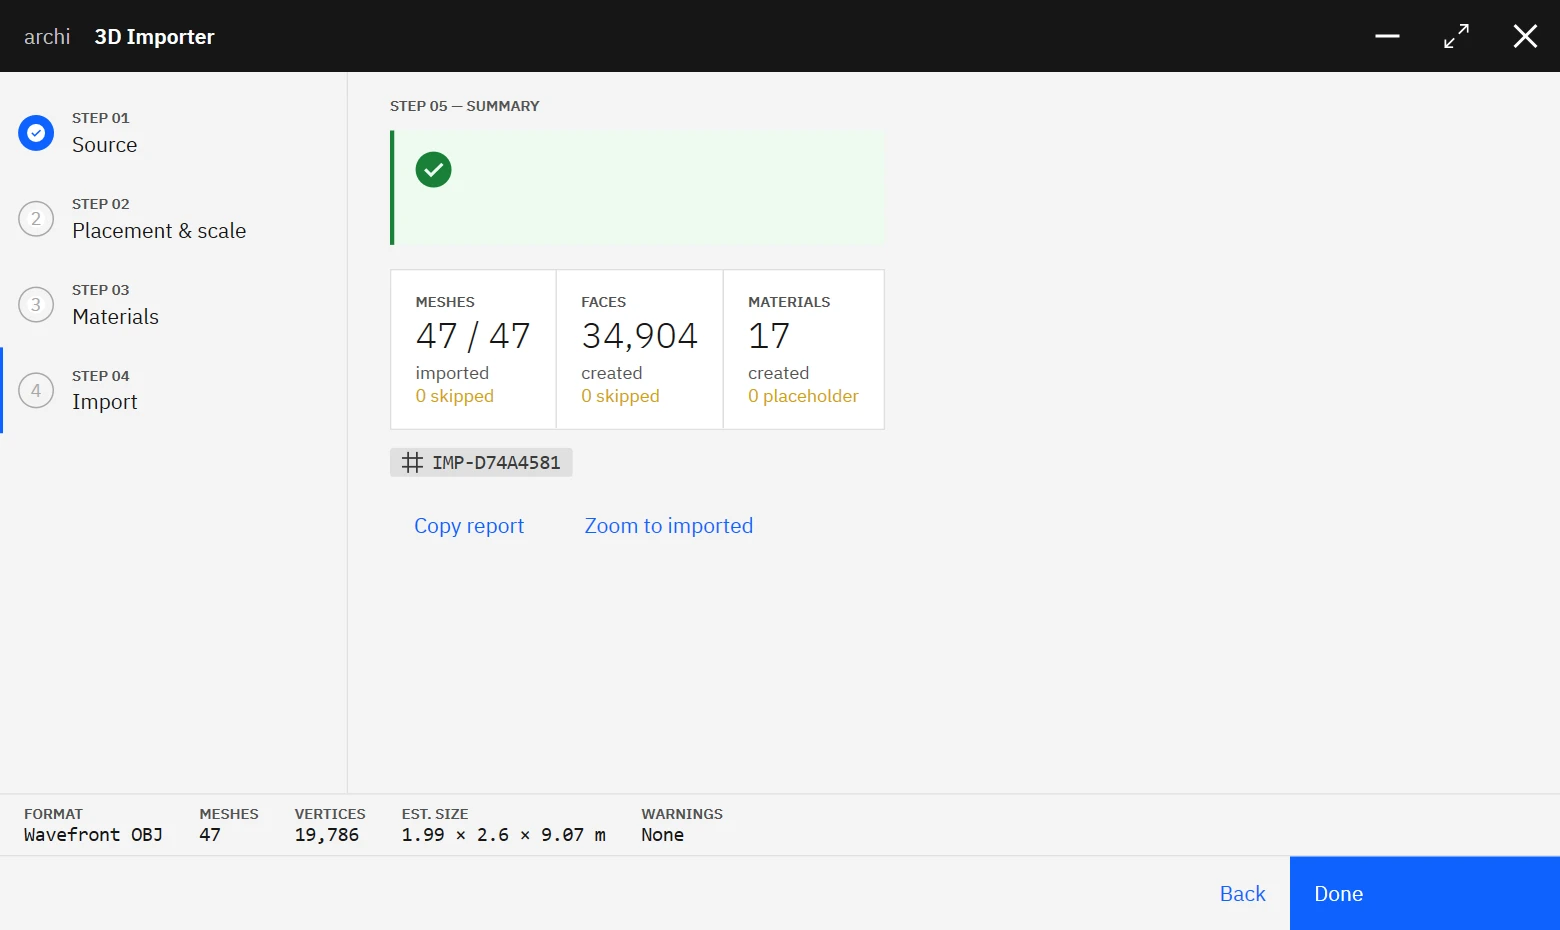
- In Step 4 — Import, run the import and review the summary.
- Confirm that the imported model appears as DirectShape geometry in the selected category.
Import workflow
Import a model
Use this task when you need to bring a supported external model into the active Revit document.
Before you begin
- Open the target project or family.
- Confirm that the source file is one of the supported formats for your Revit version.
- If you are using GLTF, keep all referenced files in the same folder.
Steps
- Open Import 3D.
- Browse to the source file and review the detected bounds, mesh, triangle, and material counts.
- Continue to Placement & scale and confirm units, up-axis, placement, and the Revit category that should receive the geometry.
- Continue to Materials and review the detected materials.
- Run the import and review the summary.
Result
The file is converted into DirectShape elements in the selected category. The summary reports the imported mesh count, created faces and materials, and lists anything that was skipped — nothing is dropped silently. Use Copy report to attach the details (including the report id) to a support request, or Zoom to imported to find the geometry in the model.
Notes
- OBJ imports can create Revit materials from the matching MTL file when it is present.
- Very small or irregular geometry can fail during tessellation; such items are listed in the summary.
Adjust placement and units
Use this task when the imported model needs to land at a specific location or when the first preview indicates a unit mismatch.
Before you begin
- Load the file in Step 1 — Source first.
- Know whether the source model uses millimeters, centimeters, meters, inches, or feet.
Steps
- Continue to Step 2 — Placement & scale. Units and up-axis are pre-filled from the file where the format carries them (DAE, glTF, 3DM, FBX) and marked as detected.
- Change the unit only if the file was authored differently; the your model will be callout shows the resulting real-world size before anything is created.
- Confirm the up-axis interpretation (Y-up or Z-up) so the model is not rotated on import.
- Choose automatic centering to the project base point, or switch to manual coordinates when the model must land on a known point.
- Enter manual X, Y, and Z coordinates if required.
- Select the destination Revit category and continue.
Result
The imported geometry is created with the chosen scale and placement method.
Notes
- Trial mode does not preserve the real scale of the source file.
Load the demo file
Use this task when you want to verify the workflow before testing your own files.
Before you begin
- Confirm that the plugin was installed completely.
Steps
- Open Import 3D.
- In Step 1 — Source, click Load demo.
- Step through the wizard with the loaded demo model.
- Run the import.
Result
A bundled sample object is imported so you can test the workflow without your own source file.
Notes
- If the bundled sample file is missing from the installation, this option is not available.
Material workflow
Review materials on import
Use this task to control how source materials are converted during an import.
Before you begin
- Load a source file and complete Placement & scale.
Steps
- In Step 3 — Materials, review the detected materials with their colour, texture, and transparency.
- Keep Import materials checked to create matching Revit materials, or uncheck it to apply one placeholder material to everything.
- Continue to the import step.
Result
Source materials are created as Revit materials with their colour and transparency. On Revit 2025 and newer, diffuse textures import as Revit appearance assets, so the model renders like the source. Sources without materials receive a neutral fallback material.
Notes
- Texture import requires Revit 2025 or newer; the classic importer on Revit 2015–2024 imports colours and transparency only.
Reassign materials
Use this task when imported geometry needs to follow project material standards after the initial import.
Before you begin
- Import the model first.
- Select one or more imported DirectShape elements in Revit.
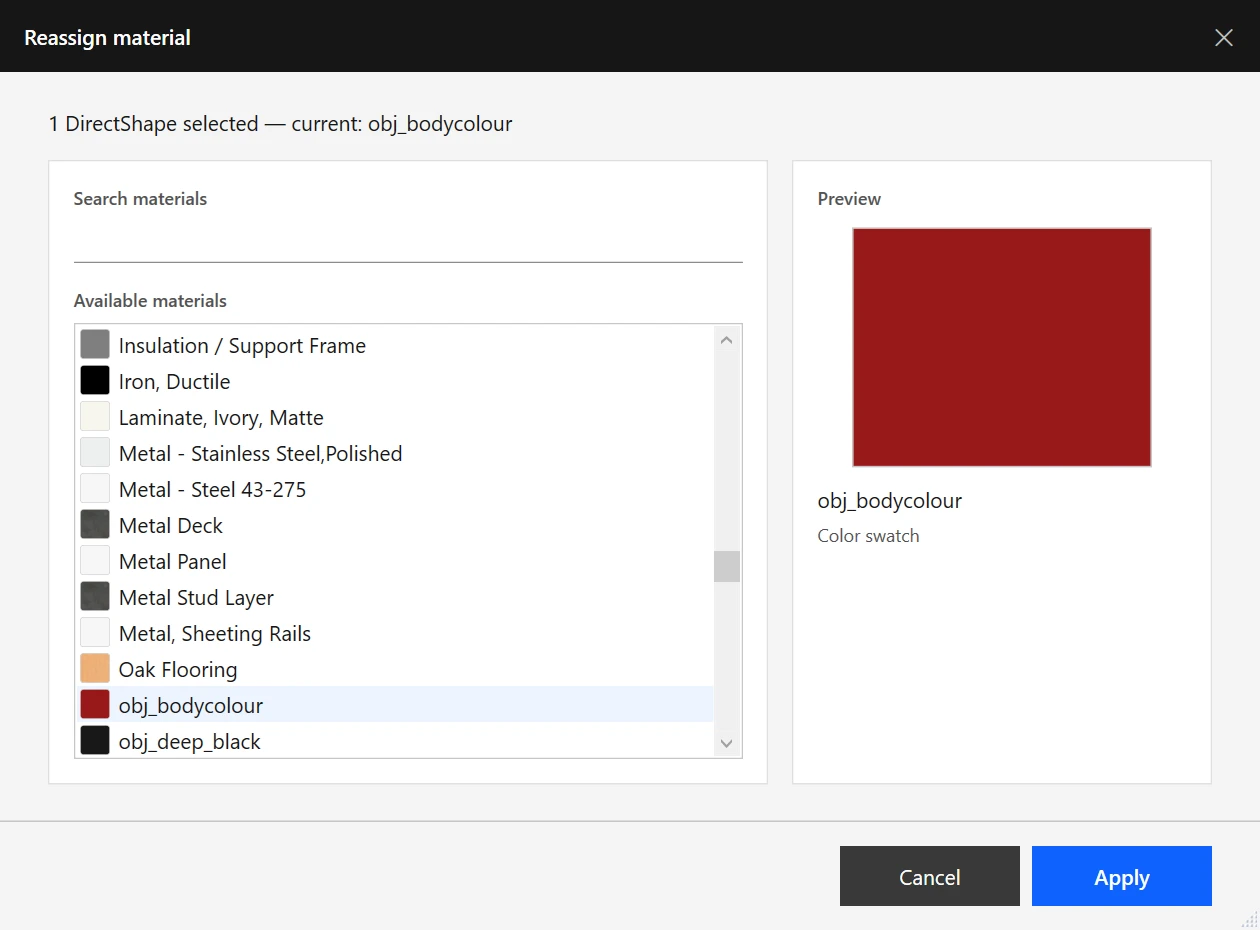
Steps
- Select the imported DirectShape elements.
- Run Reassign Material.
- Search or browse the available Revit materials.
- Select the target material and check the preview.
- Apply the material.
Result
The selected DirectShape elements use the chosen Revit material.
Notes
- If no DirectShape element is selected, the command cannot continue.
- The command also works on DirectShape elements created by other workflows, such as Rhino Inside.
- In trial mode the window remains available for review, but the material is not applied.
Settings and output
Settings and options
- Source: Browse to a supported file and review the detected bounds, mesh, triangle, and material counts — plus a pre-flight compatibility check — before generating geometry.
- Units and orientation: Units and up-axis are auto-detected from the file where available, and adjustable; a size callout shows the resulting model dimensions.
- Placement: Use automatic centering to the project base point for quick placement or manual coordinates for controlled positioning.
- Category: Select the Revit category that should receive the imported DirectShape elements, including Toposolid on Revit 2025 and newer.
- Materials: Import source materials as Revit materials, or apply a single placeholder material to everything.
Results and output
- Import 3D creates DirectShape elements in the active Revit document.
- The plugin creates Revit materials from imported source materials or colours; on Revit 2025 and newer, diffuse textures import as appearance assets.
- Every import ends with a summary that accounts for meshes, faces, and materials, lists anything skipped, and can be copied as a report with a report id.
- Material reassignment updates selected DirectShape elements to a chosen Revit material.
- Imported elements remain in the model even if the plugin is later uninstalled.
Troubleshooting and FAQ
The Archi ribbon buttons are missing after installation
Cause: Revit was open during installation, or on Revit 2025 and newer the .NET 8 Desktop Runtime is missing.
Fix: Close Revit and run the latest installer again with administrator rights; it verifies the required runtime and registers the add-in for every installed Revit version.
The file loads but geometry generation fails
Cause: The mesh can be malformed, too small for reliable tessellation, or missing required support files.
Fix: Retry with the demo file, confirm the source model is valid, ensure GLTF sidecar files are present, and test a larger unit if the source geometry is extremely small. Check the import summary — skipped items are listed there with guidance on what to try.
Materials are missing on OBJ import
Cause: The MTL file is missing or does not match the material references in the OBJ file.
Fix: Keep the MTL file beside the OBJ file and reimport. If needed, use Reassign Material after import.
GLTF import will not start
Cause: Required sidecar files are missing, or the file uses unsupported extensions.
Fix: Restore all referenced files beside the GLTF file, or use GLB when available. Draco-compressed glTF is supported on Revit 2025 and newer.
Reassign Material does not open correctly
Cause: No imported DirectShape element is selected.
Fix: Select one or more imported DirectShape elements first, then run the command again.
The imported model size is wrong in trial mode
Cause: Trial mode intentionally changes the scale.
Fix: Use a licensed installation when you need the final scale to match the source file.
Which file formats are supported?
On Revit 2025 and newer: OBJ, DAE, glTF/GLB (including Draco-compressed), STL, Rhino 3DM, and FBX. On Revit 2015–2024: OBJ, DAE, GLTF, and GLB.
Can I import SketchUp (SKP) files?
No. SKP is not supported in any version. Export the model from SketchUp to a supported format such as OBJ or DAE first.
Are textures imported?
On Revit 2025 and newer, diffuse textures import as Revit appearance assets so the model renders like the source. On Revit 2015–2024, colours and transparency import, but textures do not.
Can I use Import 3D in both projects and families?
Yes. The documented workflow supports importing into Revit projects and families.
Why does Reassign Material only work on some elements?
The command is intended for DirectShape elements, such as those created by Import 3D. It does not apply to arbitrary Revit elements.
Does the plugin remember my settings?
The classic importer on Revit 2015–2024 stores the last used file path and several import settings between runs. The wizard on Revit 2025 and newer detects units and up-axis from each file instead; persisting last-used settings between sessions is planned.