How to Override Graphics in Autodesk Revit

Welcome to our tutorial on how to override graphics in Autodesk Revit! In this guide, we'll explore the power of Graphic Studio, a game-changing plugin that revolutionizes the way you manipulate and control graphics within your Revit projects. With a simple 1-click operation, you can effortlessly override colors, types, patterns, and more, bringing your designs to life with ease.
One of the standout features of Graphic Studio is its extensive selection of pre-built rich color palettes. Say goodbye to the tedious process of individually selecting and defining colors for your elements. With a wide range of carefully curated palettes at your fingertips, you can instantly apply harmonious and visually stunning color schemes to your designs, enhancing their overall aesthetic appeal.
Graphic Studio's interface is designed to be always visible, seamlessly integrating within Autodesk Revit. No more navigating complex menus or switching between windows. Whether you're working on a single monitor or a multi-monitor setup, Graphic Studio remains readily available, allowing you to make real-time adjustments and unleash your creativity with ease.
Throughout this tutorial, we'll showcase the intuitive features and benefits of Graphic Studio. Discover how to achieve stunning visual results in your Revit projects, all while saving valuable time and effort. In the upcoming chapters, we'll delve into the step-by-step process of using Graphic Studio's 1-click operations to override graphics, including colors, types, patterns, and more. Get ready to unlock the full potential of your designs and create captivating architectural visualizations. Let's dive in!
Chapter 1: How to Override Color in Revit
In this chapter, we introduce a powerful feature of the Graphic Studio plugin: color overriding in Autodesk Revit. We've included a comprehensive video tutorial that offers a practical, step-by-step guide to enhance your proficiency with this tool.
By following along, you'll gain a visual and interactive understanding of the process, empowering you to add a new level of creative depth to your projects. The video's practical demonstration will not only clarify the process but will also provide you the confidence to implement it in your own designs.
Now that you've watched the video tutorial and gained a visual understanding of the color overriding process in Autodesk Revit using Graphic Studio, let's delve a bit deeper. We'll now transition into a detailed, step-by-step written guide of the workflow. This breakdown will further solidify your understanding, allowing you to reference each step at your own pace. Read on to grasp the nitty-gritty of this transformative feature and further enhance your design capabilities.
Step 1: Select the Revit Element to Override
Before you can change the color of any element in Revit, you first need to select the element whose color you want to override. To do this:
1. Open your Revit project.
2. Using the Select tool in the top-left corner of your screen, click on the element whose color you want to change.
You can select multiple elements at once by holding down the 'Shift' key while clicking on each element.
Step 2: Enable the Graphic Studio Plugin
Once you have selected your elements, it's time to enable the Graphic Studio plugin, in case it is not active.
1. Go to the 'Archi' tab in your Revit software.
2. Click on the 'Graphic Studio' button to enable the plugin.
You'll notice that the Graphic Studio interface opens on the side of your screen, ans stays active, making it easily accessible as you work.
Step 3: Choose Your Color
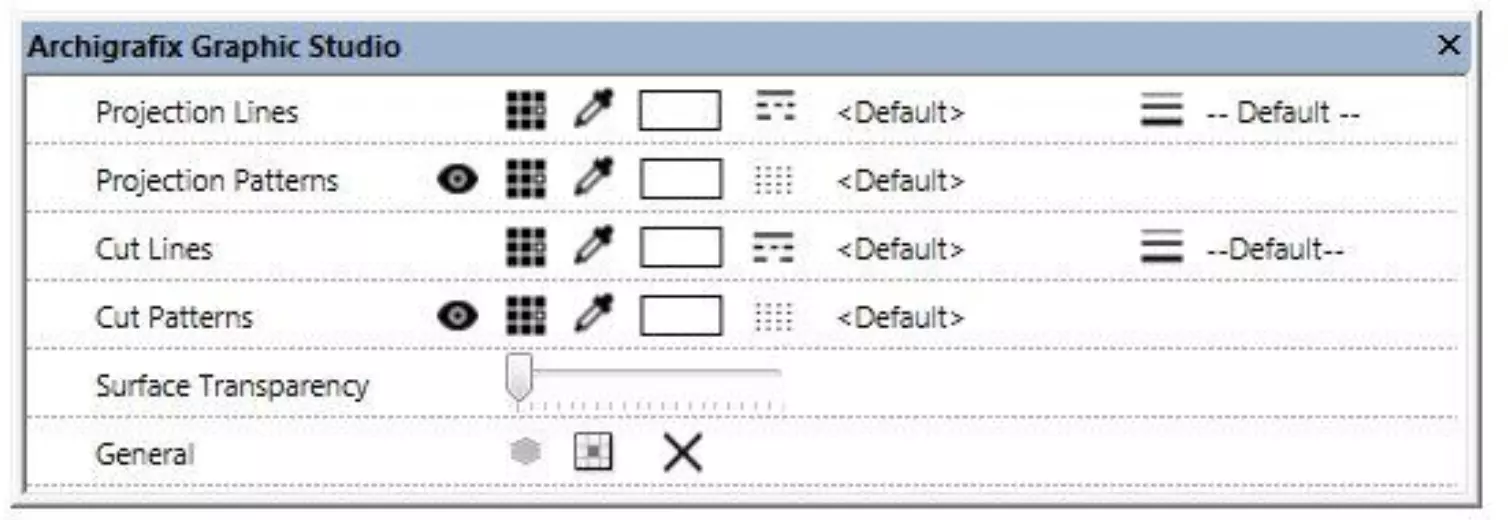
In the Graphic Studio plugin, you will see an option to 'Override Color' to either the lines or patterns.
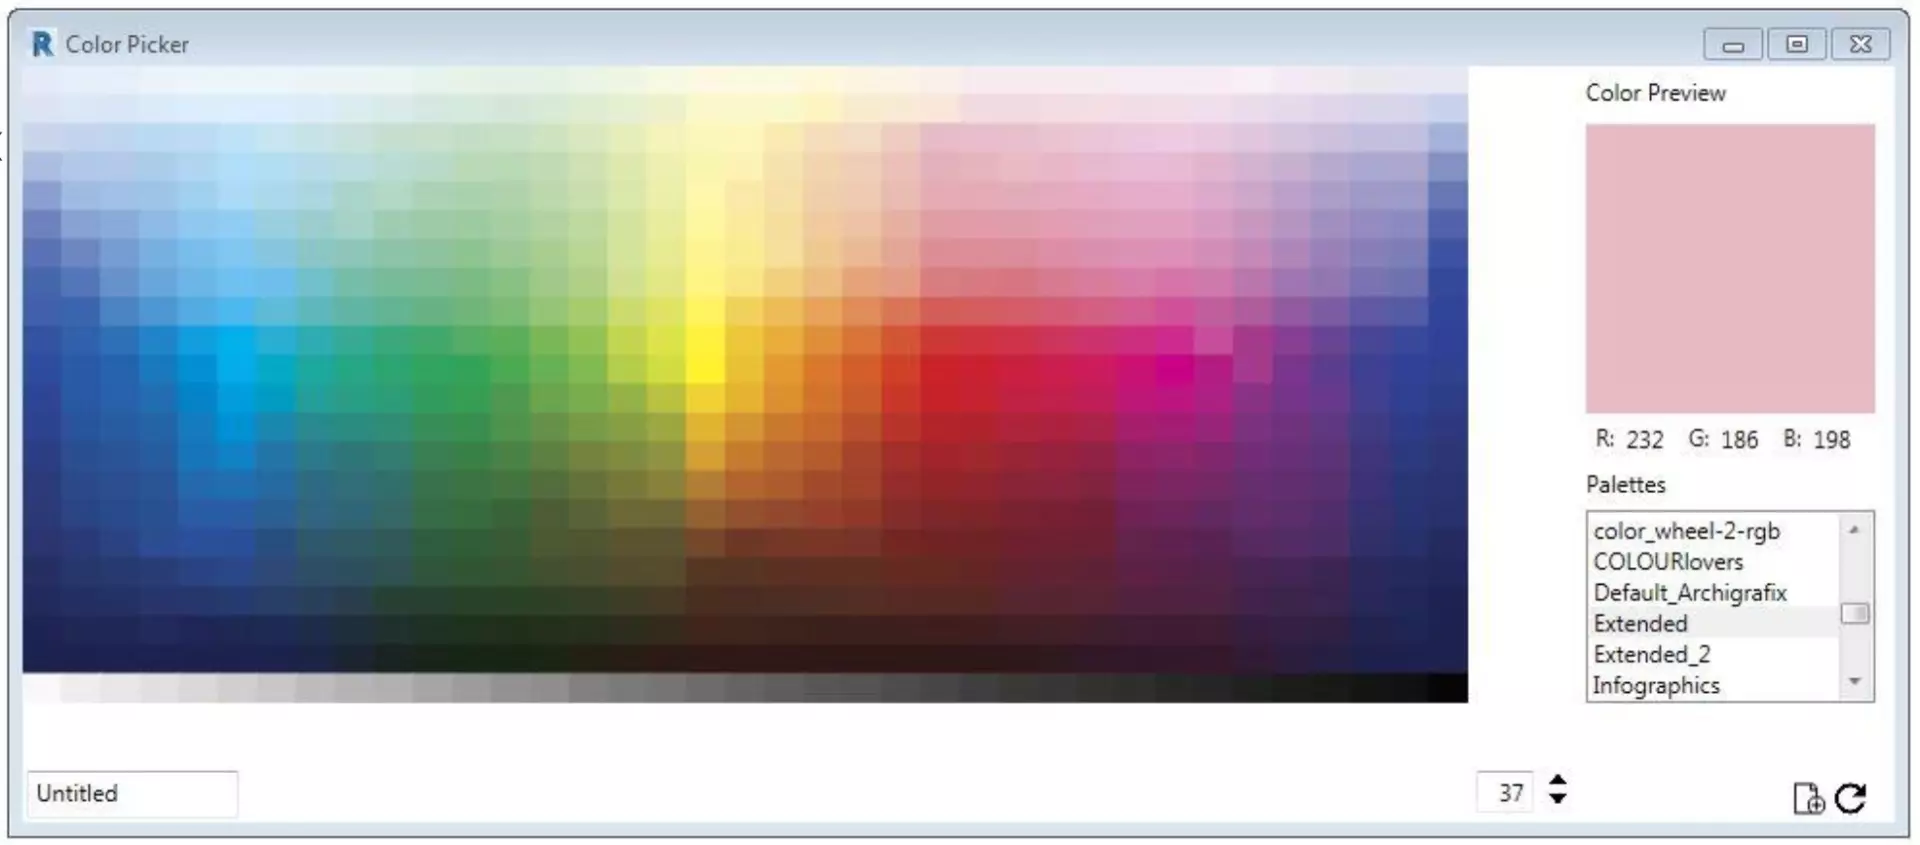
1. Click on the 'Color Palette' icon. A color palette will be presented to you.
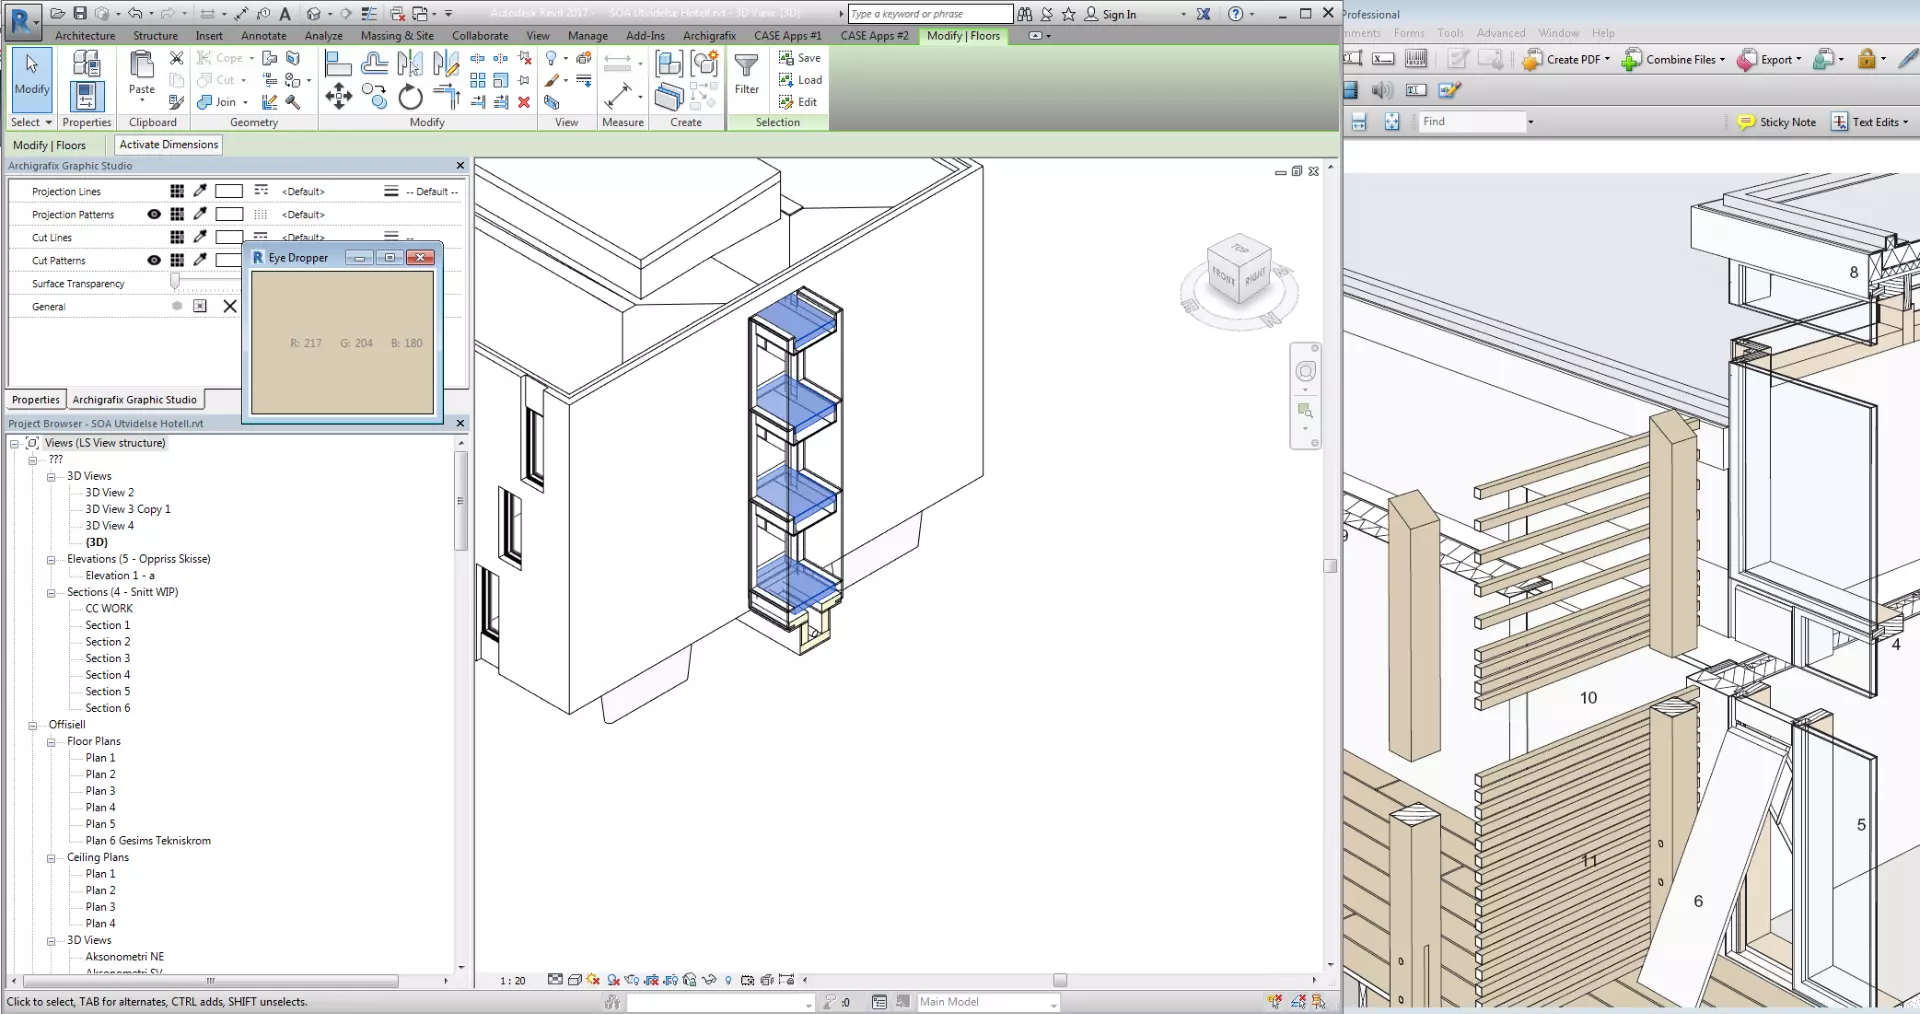
2. You can either pick a color from the preloaded palette or use the eyedropper tool to pick a color from any spot on your screen.
To use the preloaded color palette:
1. Simply hover over the color you want to use, and you will see a preview of how it will look on your selected element.
2. Click on the color to apply it.
If you are interested in importing your existing color palettes to Graphic Studio, follow this tutorial:
To use the eyedropper tool:
1. Click on the eyedropper icon, which will cause your cursor to change into an eyedropper.
2. Move your cursor to the color on your screen that you wish to use, then click. Your selected color will then be applied to the elements you previously selected.
Please note, the eyedropper tool is advanced and will be covered in detail in a separate tutorial.
Step 4: Applying Changes
After the colour is selected the changes are applyed to the elements automatically.
And that's it! You have successfully overridden the color of your selected elements in Autodesk Revit using the Graphic Studio plugin. This is just the beginning of what you can achieve with this powerful tool. Stay tuned for more detailed guides on how to fully utilize Graphic Studio's capabilities.
Chapter 2: How to Override Line Types in Revit
In this chapter, we'll continue our exploration of the Graphic Studio plugin's capabilities by focusing on how to override line types in Autodesk Revit. As with colors, manipulating line types — including their thickness and style — can significantly influence the appearance and clarity of your designs.
Let's follow a detailed, step-by-step guide to enhance your understanding of this process.
Step 1: Select the Revit Element to Override
Firstly, choose the Revit element for which you want to change the line type. Use the Select tool in your Revit project to click on the desired element. Remember, you can select multiple elements by holding down the 'Shift' key while clicking on each item.
Step 2: Override Line Thickness
With the Revit element selected, navigate to the Graphic Studio interface. Locate the icon representing 'Line Thickness.'
1. Click on this icon. A dropdown menu will present you with a range of thickness options.
2. From this menu, choose the desired line thickness. As soon as you select a thickness, it is automatically applied to your chosen elements.
Step 3: Override Line Type
To change the line type, ensure your desired elements are still selected.
1. Find the icon in the Graphic Studio interface that represents 'Line Type.' Clicking this will reveal a dropdown menu with various line types.
2. Choose your preferred line type from this menu. As with line thickness, your choice will be automatically applied to the selected elements.
Congratulations! You have now successfully overridden both the line type and line thickness in Autodesk Revit using the Graphic Studio plugin.
This process demonstrates how easy it is to refine the visual style of your designs and improve readability. Stay tuned as we continue to unlock the power of Graphic Studio in the upcoming chapters, delving deeper into other essential features.
Chapter 3: How to Override Surface Patterns in Revit
In this chapter, we turn our attention to another impactful aspect of the Graphic Studio plugin – the ability to override surface patterns in Autodesk Revit. This feature can significantly elevate your design aesthetics by allowing you to modify the patterns of various elements in your projects, including both projection and cut patterns.
Before we start, it's important to understand the difference between projection and cut patterns.
- Projection Patterns are the patterns that appear on surfaces in a view where the element is seen in projection. In other words, you are looking at the "face" of the object, like seeing the bricks on the side of a building.
- Cut Patterns are the patterns that appear on surfaces in a view where the element has been "cut" through. For example, in a section view of a brick wall, the cut through the wall would show the cut pattern.
Now, let's dive into the step-by-step guide on how to override these patterns using the Graphic Studio plugin:
Step 1: Select the Revit Element to Override
As with color and line type, your first step is to select the element(s) in your Revit project for which you want to override the surface pattern. Use the Select tool to do so, and remember, you can select multiple elements by holding down the 'Shift' key while clicking on each element.
Step 2: Override Projection or Cut Patterns
With your element(s) selected, navigate to the Graphic Studio interface. Here, you will find separate dropdowns for projection patterns and cut patterns.
For Projection Patterns:
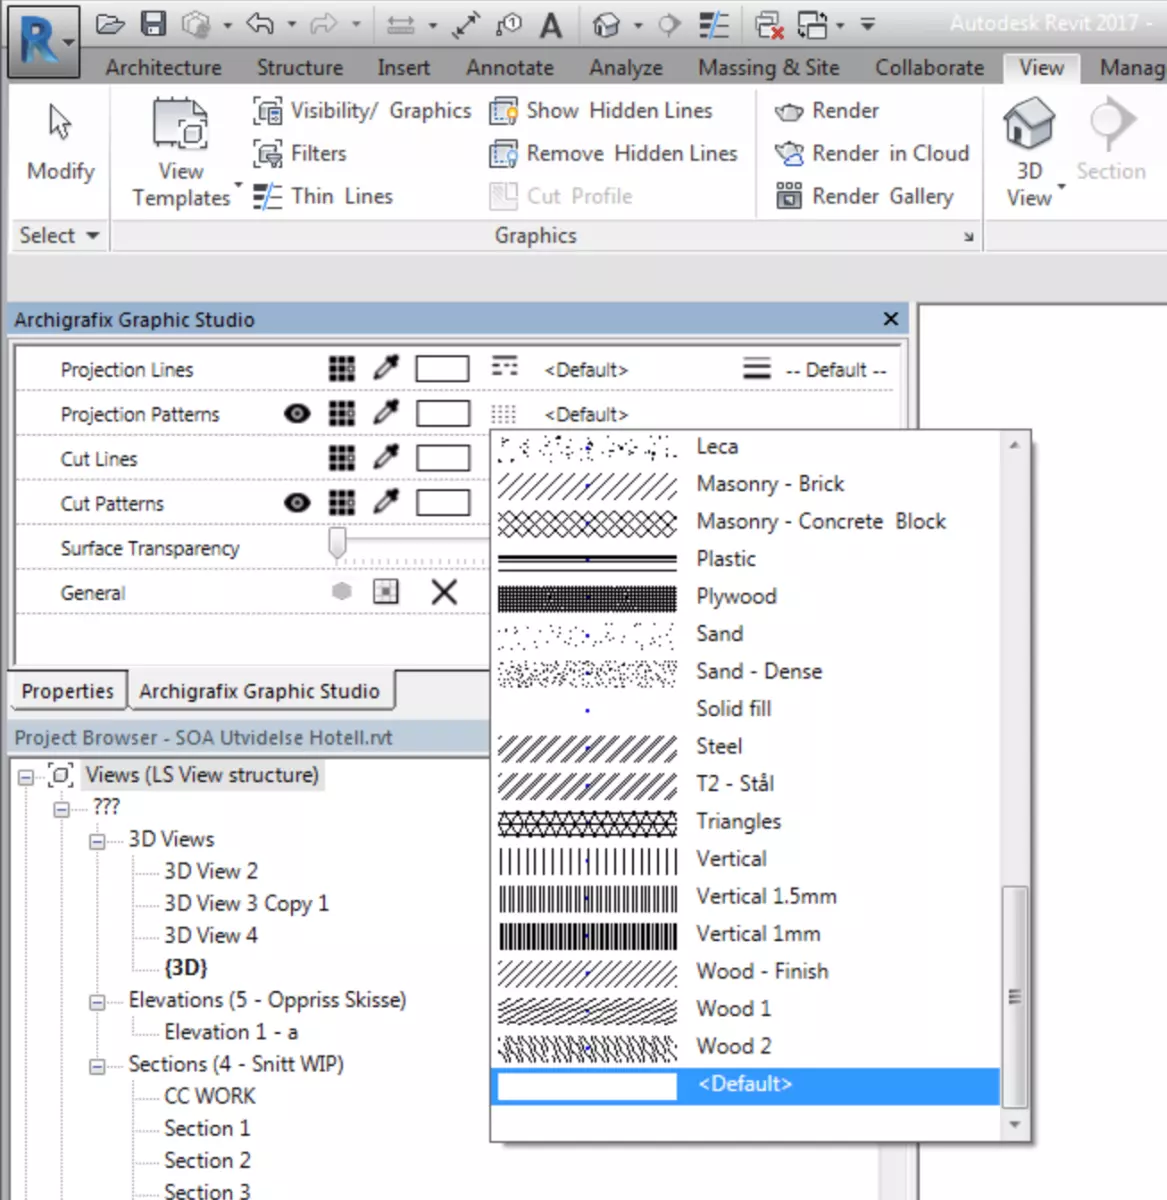
1. Click on the icon representing 'Projection Patterns.' A dropdown menu will reveal the range of projection patterns available in your Revit project.
2. Select your desired pattern from this list. Upon selection, the pattern will be automatically applied to your chosen elements.
For Cut Patterns:
1. Click on the icon representing 'Cut Patterns.' This will also reveal a dropdown menu, this time showing the cut patterns available in your project.
2. Choose your preferred pattern. As with projection patterns, your chosen cut pattern will be automatically applied to the selected elements.
You've now mastered how to override surface patterns in Autodesk Revit using the Graphic Studio plugin. By customizing projection and cut patterns, you can significantly enhance the level of detail and readability in your designs. As we continue our tutorial series, we'll explore even more of the transformative features that Graphic Studio offers. Stay tuned!
Chapter 4: How to Override by Element or Category in Revit
In the last chapter of this tutorial, we're introducing another powerful functionality of Graphic Studio: overriding by element or by category in Autodesk Revit. This feature provides a high level of flexibility, allowing you to tailor your design visuals either at a granular level or more broadly, depending on your needs.
Before proceeding, let's clarify what we mean by overriding by 'element' or 'category':
- Element: This refers to individual items within your Revit model, such as a single door or window. Overriding by element allows you to make changes to specific elements only.
- Category: This refers to a collection of elements that share a common property or function, such as all doors or all windows within a project. Overriding by category allows you to make changes that apply to every element within a specific category.
Step 1: Select the Revit Element or Category
First, you'll need to select either the individual element or the category that you want to override. This selection will be made directly in your Revit project using the Select tool.
Step 2: Choose the Override Mode
Now that you have selected your element or category, you can navigate to the Graphic Studio interface to select the override mode.
In the 'General' section of the Graphic Studio dialog, you will see two icons representing the two modes: 'Element Mode' and 'Category Mode.'
- For Element Mode, click on the icon representing a single unit or item. This will ensure that only the changes you make will apply to the specific elements you have selected.
- For Category Mode, click on the icon that represents a group of items. In this mode, any changes you make will apply to all elements within the same category as your selected element(s).
Upon clicking on either icon, Graphic Studio will automatically apply your chosen mode.
Conclusion
Congratulations on reaching the end of this comprehensive tutorial! You've now mastered how to override by element and category in Autodesk Revit using Graphic Studio, providing you with even more control over your designs. You can choose to modify individual elements for precise adjustments, or you can alter entire categories for broader changes.
But our journey into the capabilities of Graphic Studio doesn't stop here. In our upcoming tutorials, we'll delve deeper into the process of loading color palettes into Graphic Studio and using the versatile eyedropper function for precise color selection. These advanced features will give you even more control over your designs' aesthetic and help you achieve stunning results.
Thank you for following along this tutorial series. We hope you've found it useful and are excited to explore the full potential of what Graphic Studio can offer. Stay tuned for more in-depth tutorials, and until then, happy designing!

