MCP for Rhino: Connect AI to Rhino 8 with Archi Automate

Short answer: To get an AI assistant working inside Rhino 8, you connect an MCP-capable AI client (like Claude or Cursor) to Archi Automate, which runs a Rhino bridge as a Rhino 8 plug-in. Install Archi Automate on Windows, confirm the Rhino bridge is live on the Hub, click Connect for your AI client, restart it, and you can ask the model to read your model, query geometry, and — once you allow it — author new geometry. Every Rhino write is wrapped in a single managed Undo step, so nothing is ever permanent until you save.
What an MCP setup for Rhino actually does
The Model Context Protocol (MCP) is an open standard that lets AI clients talk to external tools in a structured, permissioned way. On its own, an AI chat window has no idea what is in your Rhino file. Wire it up through MCP and the model can suddenly see your layers, inspect Breps and curves, measure volumes, and — when you grant permission — create geometry. That is the whole promise of Rhino MCP: turning a general-purpose AI client into a hands-on assistant that operates on the live document open in front of you.
Archi Automate is the bridge that makes this practical for AEC. It is an "AI for AEC" automation platform that connects AI clients to live CAD and BIM tools through MCP. One Windows installer sets up bridges for the hosts it detects, and Rhino 8 by McNeel is one of four supported hosts (alongside Autodesk® Revit® 2025–2027, Archicad 29 by Graphisoft, and vendor-neutral openBIM). So when people search for MCP for Rhino, the short version is: Archi Automate is the connector, and the rest of this guide shows how the chain fits together.
The chain: AI client → MCP → Archi Automate → Rhino
It helps to picture the path a single request travels. You type a prompt in your AI client. The client speaks MCP to Archi Automate. Archi Automate routes the request to its Rhino bridge — a Rhino 8 plug-in loaded inside the running Rhino session. The bridge composes governed operations at runtime against the Rhino API and executes them in the live document. Results travel back up the same chain to the model, which summarizes them for you in plain language.
Two details matter for Rhino specifically. First, the AI is not limited to a fixed menu of canned commands; it composes operations at runtime against the host's API, which is what lets it answer open-ended questions about your geometry. Second, every write operation is wrapped in a single managed Undo record. That means a multi-step authoring request lands as one clean Undo step in Rhino, and any changes live in the session until you decide to save the file. Models are never saved automatically.
How to connect an AI client to Rhino in a few steps
The setup is short and you only do it once per machine.
1. Install Archi Automate
Download and run the single installer on Windows 10/11 x64. It detects your installed hosts and sets up the matching bridges, including the Rhino 8 plug-in. A 14-day full-featured trial runs immediately with no license key.
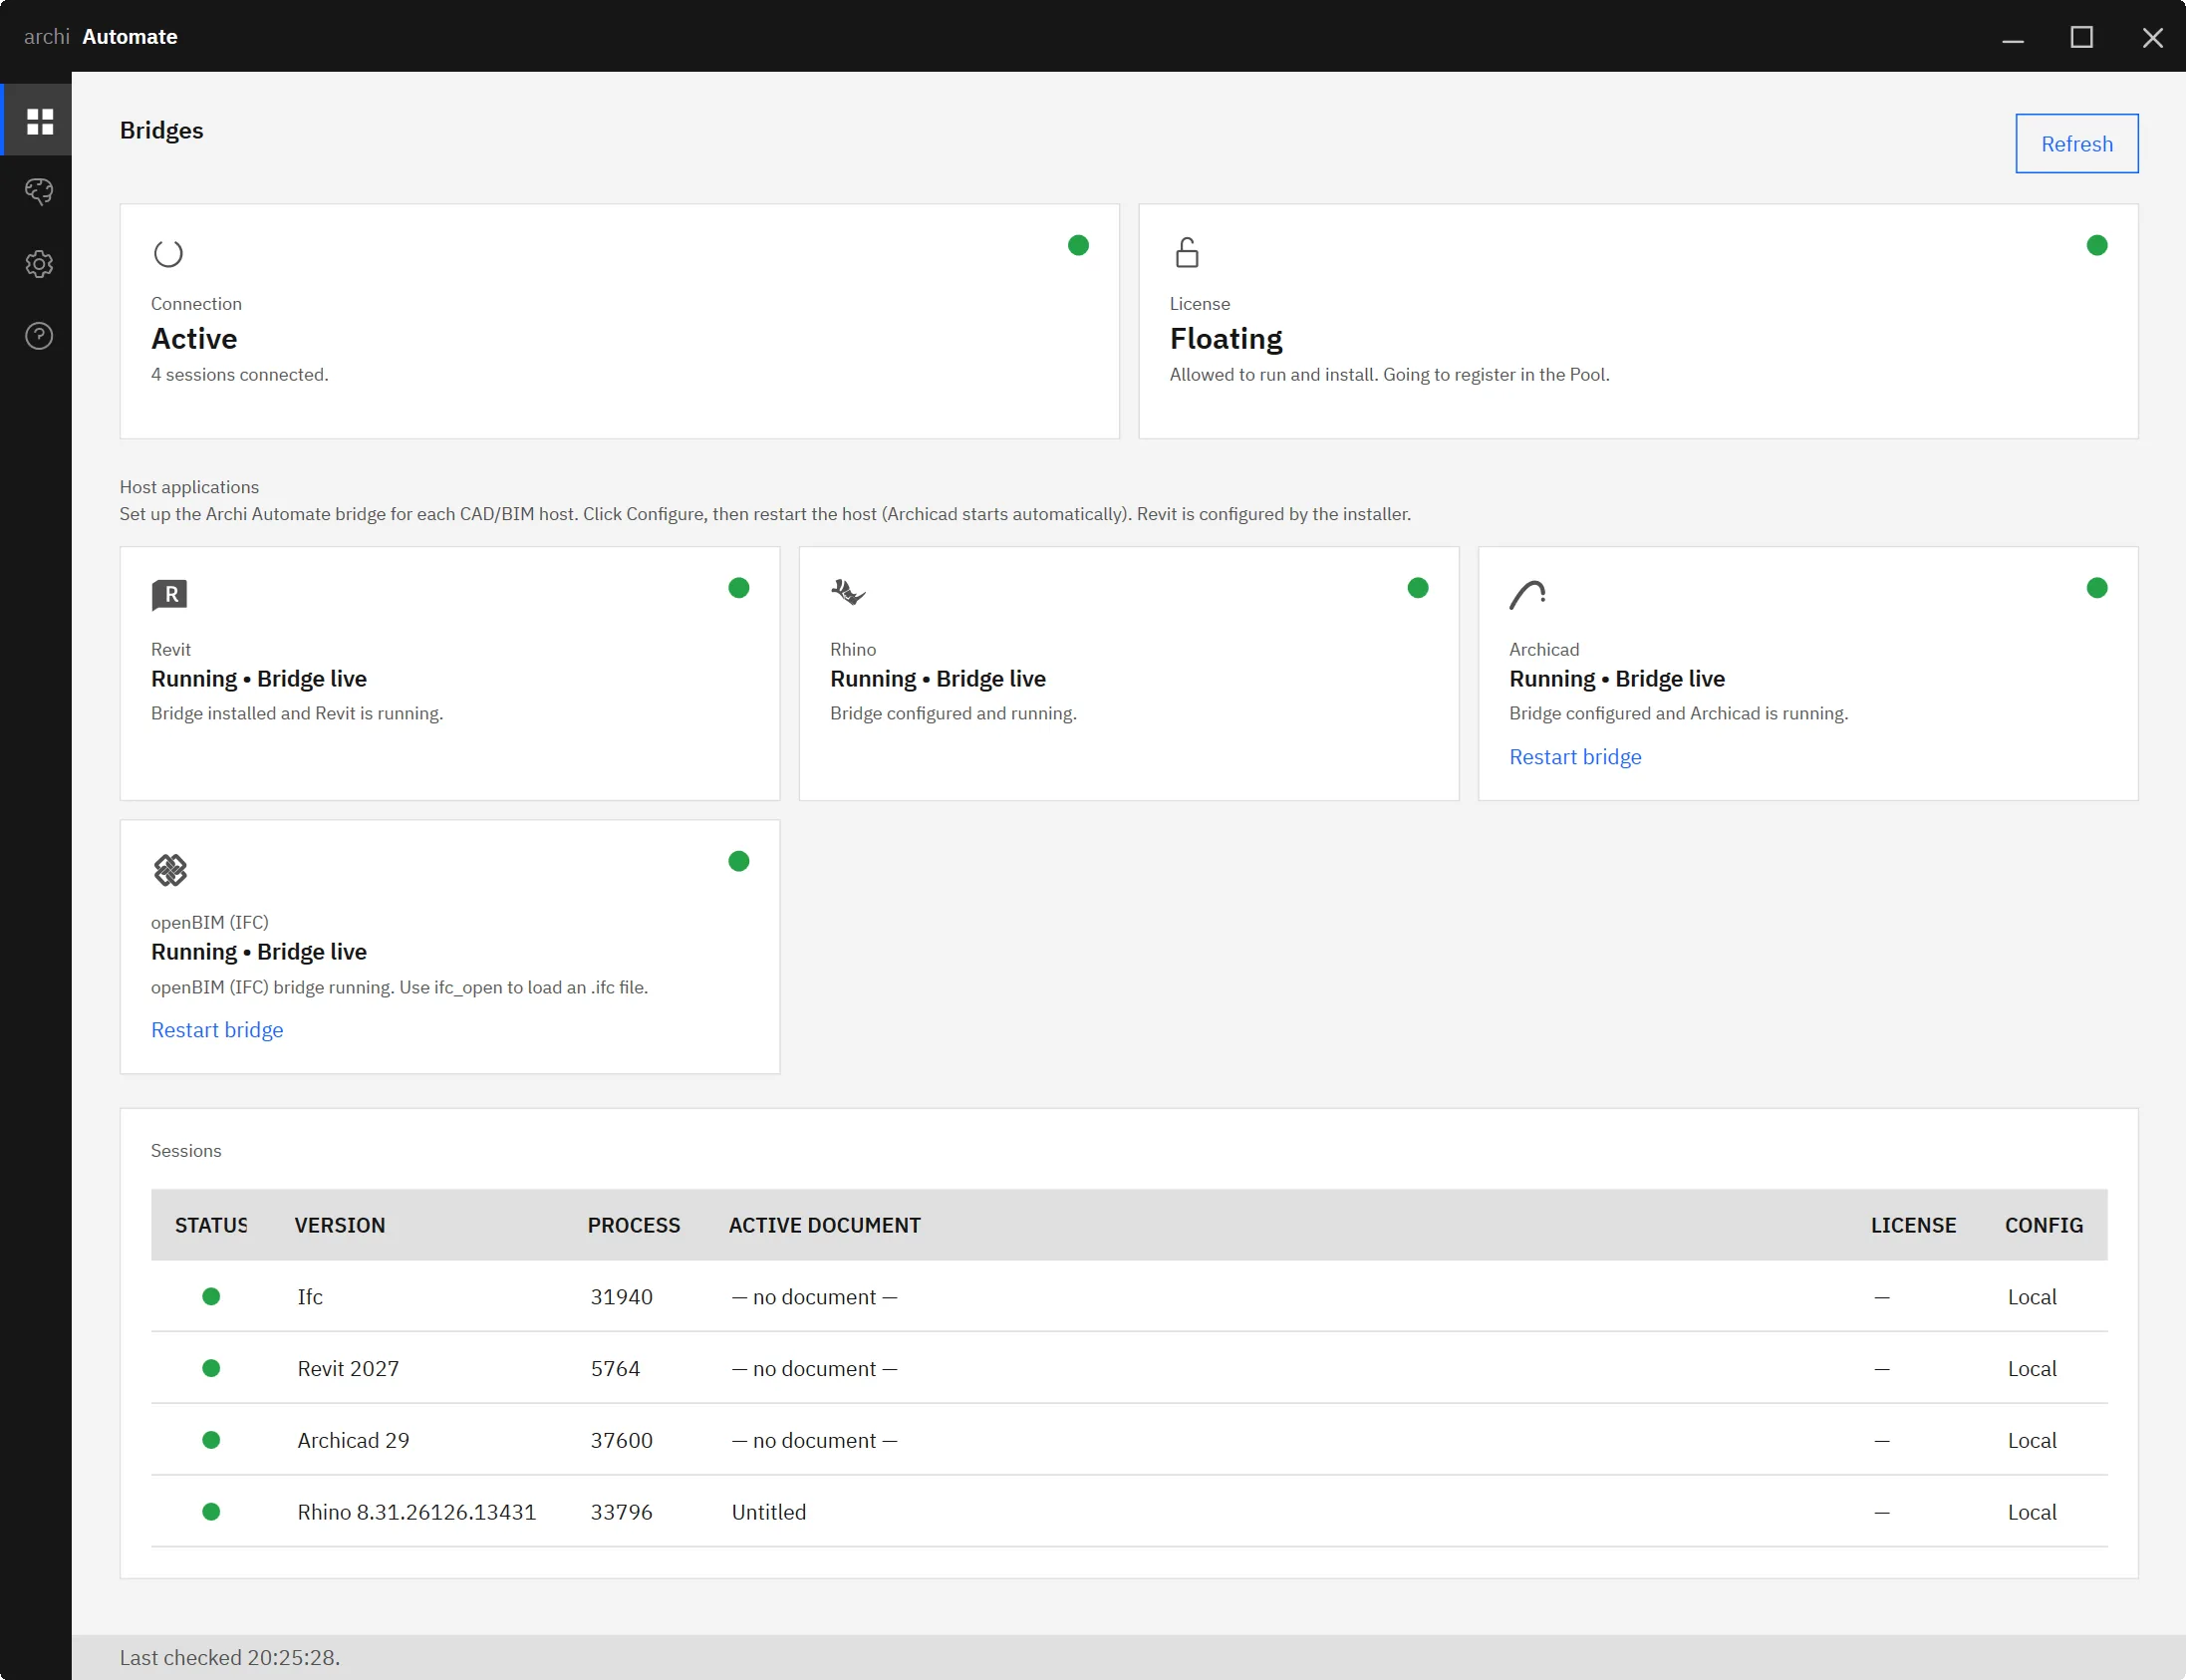
2. Confirm the Rhino bridge is live
Open the Hub — the desktop control center — and go to the Bridges page. Each host shows a status dot. Make sure Rhino is reporting as live (start Rhino 8 if it is not running yet) before you connect a client.
3. Connect your AI client
Switch to the LLMs page and click Connect next to your AI client. The Hub writes the MCP configuration into that client for you — it backs up the existing config first and performs a non-destructive merge, so nothing you already had is overwritten. This is the one-click step that usually trips people up when they configure MCP servers by hand.

4. Restart and run a read-only prompt
Restart your AI client so it picks up the new configuration, then ask something harmless to confirm the link, such as "List the layers in this file." Because the default execution mode is Read only, that first prompt cannot modify anything — it is the safest way to verify Rhino AI is wired up correctly.
Which AI clients connect to Rhino
Archi Automate ships eight one-click AI clients on the LLMs page: Claude (Desktop and Code), OpenAI Codex, Cursor, VS Code (Copilot agent), Windsurf, Antigravity, Gemini CLI, and Cline. JetBrains IDEs connect with a copy-paste snippet, and because this is standard MCP, any other MCP-capable client works too. For reliable AI-composed operations against the Rhino API, use a strong reasoning model — Claude Opus 4.8 (High) or GPT-5.5 (High) or better is the recommended tier.
If you want client-specific walkthroughs, see connecting Claude to AEC tools, connecting Cursor, connecting OpenAI Codex, or connecting the Gemini CLI. The connection flow is identical regardless of which one you pick — only the client restart differs.
What you can ask once Rhino is connected
This is where Rhino 8 automation stops being abstract. Once the link is live, you talk to your model in natural language and it operates on the open document. A few examples that map cleanly onto how the bridge works:
- "List the layers in this file." — a pure read. Useful as a first check and for orienting the model before bigger tasks.
- "Collect every closed Brep on the FACADE layer and report its volume." — the model walks the geometry, filters by layer and type, and runs the measurement, returning numbers you can act on. Still a read; nothing changes.
- "Create a grid of columns from these points." — now you are authoring. The model composes the operations and the bridge executes them inside a single managed Undo record, so the whole grid is one Undo away if you do not like it.
Reads are unrestricted by default. Anything that writes to the document — creating, moving, or deleting geometry — only runs when you have switched the execution mode to Allow changes. That separation is deliberate, and it is the core of how you connect AI to Rhino without handing over the keys.
Safety and guardrails
Trust comes from the Guardrails page in the Hub, which sets the execution mode for the session. There are three:
| Mode | What happens |
|---|---|
| Read only | The default. All writes are refused; the AI can inspect the model but cannot change it. |
| Preview changes | A dry run for Rhino model edits: the operation runs and then rolls back so you can confirm the result before committing. |
| Allow changes | Writes are applied to the live document — still wrapped in a managed Undo record, still unsaved until you save. |
On top of the mode, every operation is screened before it runs, deletions can be blocked outright, and every session is written to an audit file you can review later. Combined with the managed Undo behavior, that gives you several independent ways to catch an unwanted change: preview it first, refuse it by policy, undo it after the fact, or simply close the file without saving.
Where to go next
If Rhino is one of several tools in your stack, the same install already bridges the others. For BIM-heavy workflows, read MCP for Revit and the broader Revit automation guide. For element-based modeling in Graphisoft's tool, see MCP for Archicad, and for vendor-neutral IFC, IDS, BCF and clash workflows, see MCP for IFC and openBIM. Each host behaves a little differently, but the connection flow you learned here carries over.
Ready to try Rhino MCP yourself? Start your 14-day free trial — no license key required, full features, and the Rhino 8 bridge is ready the moment the Hub detects your install.


